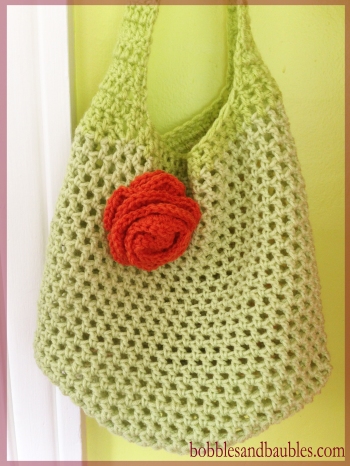
I love the look of this market bag and I was able to put the pattern together and whip it up in a matter of hours. I took bits and pieces of patterns from other bags I have attempted in order to make this come together. I think it’s quite lovely. Working in double crochet gave it amazing flexibility and stretchability (is that even a word?). See the pattern below. The completed bag is available for sale in my Etsy store, just click on the picture or the Etsy link on your right! Happy hooking!
Materials:
1 skein any color worsted weight yarn (and a 2nd accent color if you wish for the handles, as you can see I used a shade darker for the handles)
Size I Hook
Needle for weaving
Directions:
Rd 1: Ch2 (counts as first dc) . 11dc in a magic ring. Join at top of ch2 sp (12 dc)
Rd 2: Ch2. 2dc in each st around. Join at top of ch2 sp. (24dc)
Rd 3: Ch2, dc in same st. *dc in next st, 2 dc in next st, dc in next st* around. Join at top of first dc (36dc)
Rd 4: Ch2, dc in next st. *2dc in next st, dc in next 2 sts, 2dc in next st* around. Join at top of first DC (48DC)
Rd 5: Ch3. *dc, ch1 in next st* around (DO NOT JOIN – place marker on first st. You will move the marker up every 2 rows)
Rd 6-30: dc, ch1 in each ch1 space (you may continue past round 30 for a longer bag).
Join to first dc
Rd 31: Ch2. Dc in every ch1 space
Rd 32: Ch2. Dc between each dc. Join with 1st dc (DO NOT FASTEN OFF)
Straps:
Row 1: Ch2, dc in next 9 sts (10dc)
Row 2: Ch2, turn. Dc decrease next 2 sts. Dc in next 5 sts. Dc decrease in last st (8 dc)
Row 3: Ch2, turn. Dc decrease next 2 st. Dc in next 3 sts. Dc decrease in last st (6dc)
Row 4-18: Ch2, turn. Dc in next 5 sts (you may continue past row 18 for a longer strap)
Fasten off and sew in ends. In order to determine where to place the other half of your strap, fold and lay bag flat and find the starting point for the opposite side. repeat pattern above and single crochet ends together.
I found a great tutorial (with pictures) for the rose applique here.
If you make the bag, send me pics so I can place it on the blog!


It’s beautiful!!
I love this bag 🙂 Would it be okay if I pinned it to my Crochet board on Pinterest? Thanks so much !
Of course! Pin away! 🙂
Thanks!
super cute! thanks for sharing the pattern.
approx how many yards/meters did you use for this?
I used an 8oz skein of yarn. That roughly converts to about 370 yards. I hope this helps!
I’m almost finished with the bag I love it! Did you increase stitches at the end of the strap so both ends are the same? Thanks.
Linda, I did both straps separately and then stitched them together at the top. But you can just do one long strap and then increase in the two rows before the last one.
Thank you for sharing! I am going to make this to take with me to a Labor Day event. It is fun to create your own fashion with customized colors! Thanks again!! Keep shining!! 🙂
Reblogged this on happycat13 and commented:
Sweet bag!!
Love it! Pinning …
Hi Penelope – I seem to be having a problem at this stage …
Rd 4: Ch2, dc in next st. *2dc in next st, dc in next 2 sts, 2dc in next st* around. Join at top of first DC (48DC) No matter how many times I restart this round, I always end up with more than 48 stitches. Any thoughts??? I loooove this bag and would love to finish it 🙂
I have a quick question for you.. Did you finish round 3 with 36 dc’s? and how many are you ending up with?
Hi Vanessa Yes I finished round 3 with 36dc. I tried round 4 three times and each time ended up with over 54dc. I didn’t count after 54 as then i would rip all the stitches out and start again!
Hmm.. if you finished with 36 in the previous round, it would be mathematically impossible to go over 48 in the next round. Here are a few tips: make sure that you are not adding any extra double crochets in this round (after the initial dc, you should follow the pattern: 1dc in the next 2, 2dc in the next, 1dc in the next 2, 2dc in the next, etc..). Match up your DC’s to the previous round. You will be able to visually gauge if you are adding to many.
If you have restarted this round several times, your stitches may be a bit stretched, so how about restarting the previous round first (rd3). i know it’s tedious and frustrating, but you will have a better visual on your stitches, and they’ll be a bit tighter.
Place a safety pin in the very first stitch of this round (rd4). maybe you aren’t going over, maybe you are going past the beginning?
If I think of anything else that may be affecting this round, I’ll let you know. In the meantime, i hope some of these tips may help solve the problem.
Keep me updated!!!
Thanks so much for taking the time to reply – i will start again from round 3 🙂
Hi, I think the repeat star for row 4 is what confused me. It says: “Rd 4: Ch2, dc in naext st. *2dc in next st, dc in next 2 sts, 2dc in next st* around. Join at top of first DC (48DC)” but I think it should be “Rd 4: Ch2, dc in next st. 2dc in next st, *dc in next 2 sts, 2dc in next st* around. Join at top of first DC (48DC)”. I’m making this using Lily sugar ‘n cream and so far love how it is coming out. Thank you for the pattern!
Whoop whoop !!!! All done 🙂 Thanks for the pattern x x
YAY!! I’m so glad you were able to make it past the dreaded 4th row! :):)
Hi Vanessa, i am starting rnd 6… it says not to join the wound… confused as to where the dc starts, in the next dc or the next ch1 space? Sometimes I over think things when I crocheted.
Hi Debbie, You should use a stitch marker starting in row 5 to keep track of your rows. i used a safety pin. Just put it on your first stitch, this way you won’t have to constantly keep counting your stitches as you work your rows. You should do a dc in each ch1 space, you won’t see any edges this way. I hope this helps!! 🙂
I know this pattern is 3 years old, but I would like to know is: On RD 5 you say to ch3, then *dc, ch1 in every st* around. DO NOT JOIN! Place a marker on the first st. Is the first stitch the top of the ch3 or the first dc?Also I think your intention was for the ch3 to be a dc AND the first ch1 (atleast it comes out to look that way lol), so is the pattern after the ch3: dc, ch1 in every bottom dc in round 4 or is it ch3: dc, ch1, skp next st, dc ch1 skp?
[…] Market Bag with Floral Accent – Bobbles and Baubles […]
This pattern is just what I was looking for – so I have included a link to it in my blog – http://alittlebirdmademe.com/2013/08/09/friday-finds-a-list-of-21-links-to-free-patterns-for-crochet-market-bags/.
Feel free to stop by and grab a button to show that you have been featured.
Hi. I don’t quite understand round 5. If do not join how to continue in rounds.
Try as I might (about a dozen times and have now given up!) I simply cannot get 36 stitches in round 3. What am I missing?
Linda G
Lovely! Could you please tell me the rough dimensions (size) of the bag?
I love this pattern!!! It was quick and easy to make. I made several to sell at a fair recently. Thank you!!!!
You’re very welcome!
ok feeling stupid. I am just now starting round 6.The pattern is easy enough, but in reading ahead there doesn’t seem to be any decreases in bag to shape it. I feel like I am going to end up with a big circle. What am I not seeing. Rheta
You make a circular base, then double crochet+ chain one into each box from the rows below creating a tube as long as you want.
It takes a few rounds before the tube starts to form. Just keep going.
Thank you for this market bag. I don’t think I followed the instructions exactly, but it looks right! I plan to make it again!! This, my first finished project, is going to a friend.
** I wanted to send a picture but can’t seem to figure out how to do that. Do you have an email I can send it to?
Thank you for making this pattern. i have a black one similar to this that i bought in a resale store. i love it and wanted to make more colors. I looked at about two hundred patterns that were not near to the bag i want before i found yours that is perfect. The bag i have is lined with pockets and is wonderful for a purse. After reading the comments i just hope i can make it since others are having problems. Again, thank you.
Hi!
Thanks for the pattern for this easy and pretty market bag! I took three days to make it with lots of breaks! I knitted it quickly when my sister was here as a gift! So excited 😊
Thanks again!
Love,
Nirupama
Ps: how do I share a pic?
Looks like a great bag lm a beginner is there some where on web explaining rounds and when you say double crochet into second loop then double crochet in hole cannot understand.i’ve made Afghan both single and double crochet a’m I that dum
Love the look of the bag not understanding ( single and double crochet) I understand but in this bag when you say double crochet in loop what loop i’m a beginner have made Afghan both with single and double crochet turn is understanding is there a website explaining stitches.thanks, Susan
Just finish the bag it came out great, going to make several more for gifts. But one think i cant get the link for the flower . I click on here, but i cant find the flower pattern. Help
thank you
Sharon
It looks like the website linked to is down. Here’s a different one I’ve tried. It isn’t exactly the same but still pretty! https://katicrafts.wordpress.com/tag/rose/
Hey, I do not for the life of me understand this part.
Rd 5: Ch3. *dc, ch1 in next st* around (DO NOT JOIN – place marker on first st. You will move the marker up every 2 rows)
Rd 6-30: dc, ch1 in each ch1 space (you may continue past round 30 for a longer bag).
The marker is there so that you know where your rounds start since you will not be joining at the end of every round. You are just going to keep crocheting around and around, using your marker as a guide.
[…] source […]